Remember to check out these websites for more products and updates:
Materials:
Construction Paper
3”, 6-Petal Hole Punch
Scissors
Elmer’s Glue
Lollipop stick (can use pencil, see instructions on step #10 to get an idea or what you can use if you don’t have a lollipop stick available)
3”, 6-Petal Hole Punch
Scissors
Elmer’s Glue
Lollipop stick (can use pencil, see instructions on step #10 to get an idea or what you can use if you don’t have a lollipop stick available)

Optional:
Glue Gun
Bottle of Glitter

1.
Hole punch 3 flowers from the construction paper

2.
Hold the first flower up. Fold the flower in
half matching the top three petals to the bottom three petals. Do not fold in
the middle of the petal. Make sure it looks exactly like the picture below. Rotate
the flower and repeat the fold to make fold marks between each petal.


3. Repeat step #2 on the other two flower punches.

3. Repeat step #2 on the other two flower punches.
4.
Take one flower and make and cut between the
petals to the middle of the flower. Set this flower aside. Note this will be
flower number 1.


5.
Take the second flower and make the same cut
between two petals. One the other side of the petal, make the same cut to the
middle to cut out the entire petal. You should now have a “teardrop” shape. Do
not discard the rest of the flower. Note the flower will be flower number 2.

6.
Take your third flower and cut between two petals
to the middle. Move two petals over and make the same cut to the middle. You
should now have a “heart” shape cut out of the third flower. Do not discard the
rest of the flower. Note this will be flower number 3.
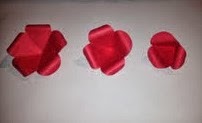
 Once you cut flower number three, you should end up with five pieces:

7.
Take flower number one and place glue on the “petal”
to the left of the incision. Take the petal on the right side of the incision
and place the back of that petal onto the glue. Your flower base will begin to
take a cone-like shape with five “petals”. Set this aside to dry. See “Tips”
below for more on drying your flowers easily.


8.
Take flower number two and place glue on the
petal left of the open area. Place the back of the petal to the right on the
open area on top of the petal with the glue. You will notice a cone-like shape
with four petals.


9.
Take flower number three and place glue on the
petal left of the open area. Place the back of the petal to the right on the
open area on top of the petal with the glue. You will notice a cone-like shape
with three petals.


10.
Grab flower number one. Using your lollipop
stick, roll all of the “petals” (individually) back onto the stick (see
picture). I start at the top of the petal and push down onto the stick. Hold
the petal at the tips of your fingers and roll downward. Continue on each petal
for flower number one, two and three.


11.
Grab the teardrop shape you cut from flower
number two. With the point of the teardrop facing downward, place the lollipop
stick on the right edge of the teardrop. Roll the paper over the lollipop stick
folding the paper toward the middle of the teardrop.


12.
Complete the same process on the left side of
the teardrop.


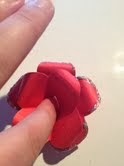
13.
Once you complete step #11 and #12, your piece
should look like this:

14.
Next, grab the heart shape from flower number
three. Place the lollipop stick on the right edge of the heart. Roll the side
in until the lollipop stick reaches the middle of the heart shape.


15.
This next part is tricky. Hold the flower with
the folded right edge facing you. Place the lollipop stick on the back of the
left petal at a right diagonal. Roll the petal back onto the lollipop stick.


Your previous heart shape should now look like this:


Your previous heart shape should now look like this:
16.
Place the lollipop stick back in the right side
of the heart. Push the left side of your heart backward and around the back of
the right side of the heart around the lollipop stick (see pictures). You might
have to manhandle the paper a little bit, but work with the paper to make sure
it doesn’t rip. If it does rip a little, that’s okay, but try to avoid it.


17.
This part is optional. Take flower number one
and using your bottle of glitter glue, trace the edge of the petal with
glitter. Set aside to dry. Continue this process with flower number two and
flower number three. See Tips below this tutorial for more on this part.

18.
Once your flowers have dried, grab flower number
two and flower number three. Cut off the bottom of the cone. Don’t cut off too
much. Start with a little at a time to determine how much you will need to cut
off. Read step #19 to see how you would determine this.


19.
Place flower number two inside flower number one
and make sure the space between both flowers is acceptable. Take flower number
three and stack it on top of flower number two and make sure the space between
both flowers is acceptable. Repeat step #18 to trim down the flowers if the
space is too high.


20.
Start with flower number one and flower number
two. Take your Elmer’s glue (or glue gun if you prefer) and place enough glue
in flower number one to securely hold flower number two.

21.
Allow flower number one and flower number two to
dry if you would like, but it is not necessary. Place enough glue around flower number three to securely hold it in place. The glue will begin to pool at the bottom and weaken your paper if you put more glue in the middle to hold flower number three in place. This is why we glue around the edge of the hole (see pics).


22. Set aside flower number one, two, and three dry. Next take the two extra pieces (the former teardrop
and former heart) you folded earlier. Place a tiny amount of glue near the
bottom of the former “heart” shape. Place the former “teardrop’ shape into the
glue of the former “heart” shape. The shapes almost "hug" each other creating a circle when you view from the top after you place them together. Follow the pictures carefully to make sure you insert the teardrop shape correctly. We will now call this the “Top”. Let the Top
dry.


23.
Once the former “heart” and former “teardrop”
shapes have dried, cut off the point at the bottom.


24.
Put a small amount of glue in the hold of flower
number three. Place the Top into flower number three and allow to dry. Again, this is optional, but you can place glitter glue around the exposed edges. I find the more fine the tip for the glue, the better your rose will look. After a few tries, you'll create your own process and figure out what looks good to you!


25.
Your rose is now complete! You can do all sorts of things with these roses. If you have the time, I highly recommend these for Weddings, Baby Showers, etc. I received a quote of well over $1000 for real flowers for my wedding. I did not want to spend that much money on something that won't last. Instead, I spent less than $50 on all of my flowers for my wedding including all materials, threw a Crafternoon with my friends, taught them how to make the paper roses, got to keep my bouquet forever, and here were the results:


Hope you enjoyed the tutorial! Remember to check out www.facebook.com/everythingglamAZ for more updates or to order these bouquets ($75 for small, $100 for large in your colors).
Tips
1.
On step #7 and #8, Use a paperclip on the glued
petals to keep the petals together while they dry.


2.
If you plan to put the rose on a stick of some
sort, trim the bottom of flower number one between steps #17 and #18
3.
Use a glue gun to attach the rose to other
objects.
4.
Regular paper (book paper, sheet music, computer
paper) works too, but practice using construction paper first to understand how
the paper should look and feel throughout the process.
5.
Leave any comments or questions below! Make sure
to check out our Etsy store in the links at the top!
No comments:
Post a Comment