Check out our Etsy pages for more items!


Materials Needed:
2 – 3”x6” fabric1 – 1”x3” fabric (will be the middle piece)
Scissors
Pencil/Chopstick/Something pointy to shape corners
Scissors
Pencil/Chopstick/Something pointy to shape corners

Make sure you know the right side of your fabric from the
wrong side of your fabric.


Take the right side of both pieces of fabric and put them
together. Make sure all four edges are as even as possible.

Next, sew a straight line on each edge until you reach the
beginning stitch. This will create a rectangle on your fabric. Make sure there
is no space on the corners between the stitches.


Pull the fabric apart to make sure each side has been securely stitched.

Next, hold the rectangle with the longest sides facing
vertically. Fold the fabric in half (hamburger style).

If you need to, mark the exact middle of the fabric with a
pencil.

Pull both sides of the fabric apart and away from each
other. It is important that the sides of the fabric do not touch for this next
part.


Once the right side of your
fabric is on the outside, use your pencil, chopstick, or other pointed object
to shape your corners. I find the chopstick works best because it does not mark
your fabric or potentially stab you like scissors can.


And like this in the back:

Hold the piece of fabric with the incision facing you. Fold
the fabric down (hotdog style) toward you. The incision will be in the fold.


With your fabric folded in half like so (open end facing upward):

Pinch the middle bottom of the fabric:

Fold one side of the fabric back on itself until it is even
with the middle part you are pinching.

Once it is folded, it should look like this:

Turn the fabric around as seen in the next picture.

Now fold the other edge of the fabric down.


Your fabric will look like an accordion:

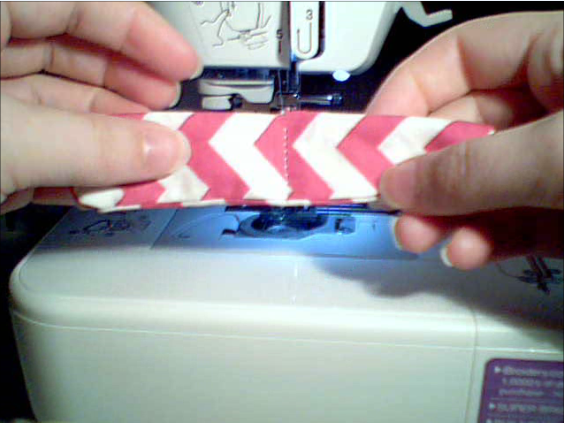
Next, find the middle of the fabric while you are holding it lengthwise horizontally. Place the fabric in the sewing machine (see the picture below) and sew a straight line.

When you open the sides of the fabric, you can see the bow shape, BUT we still need to add something to hide our stitches in the middle of the bow.

Grab your smaller piece of fabric.

Fold both edges to the back. This will create a straight, clean edge in your fabric.


Place the middle of the smaller piece of fabric in the
middle of the front side of your bow.

Wrap your smaller piece of fabric around the front of the
bow and bring both ends together in the back.

Sew the ends together “trapping” the bow in place. I find it
helpful to stitch the ends to the edge of the back of the bow to keep it from “rolling”
around the bow. See the tips at the end of this tutorial for other options if you plan to add a clip of some kind (alligator clip, bobby pin, etc).


Cut the excess off the ends of the middle piece.

And now your fabulous fabric
bow is complete! See below for extra tips.

Tips:
1. Before you fold the bow, add thick felt inside the incision of the fabric while it is
right side out to create a sturdier shape in the bow.
2. You can make your middle piece bigger or smaller, but the
bigger it is, the more flaws you are able to hide.
3. You can glue the middle section down later after you have attached an alligator clip or glued the entire bow to a surface. You do not need to sew it directly to the fabric.
Make sure to leave any questions or comments in the Comments section below! Thanks!!
No comments:
Post a Comment